Are you tired of dealing with a leaky and outdated shower? Unity Metal has got just the solution for you! In this article, I’m going to show you how to install a Unity Metal shower tray like a pro. With our easy-to-follow steps and helpful tips, you’ll be able to transform your bathroom into a modern oasis in no time. So grab your tools and let’s get started on this exciting DIY project together!
Table of Contents
Measuring and Preparing the Shower Area
First, you’ll need to measure and prepare the shower area before installing the shower tray. To begin, we’ll gather all the necessary tools and materials. This includes a measuring tape, level, drill, screws, and waterproofing materials. Next, we’ll carefully measure the dimensions of the shower area to determine the appropriate size for our shower tray. It’s important to ensure accurate measurements to avoid any issues during installation.
Once we have our measurements, we can start preparing the shower area. We’ll remove any existing flooring or tiles in that space. If there is an existing drain hole, we’ll make sure it aligns with our new shower tray’s drain location.
Next, we’ll assess the subfloor condition. It needs to be clean and level for proper installation of the tray. If there are any irregularities or damage present, we’ll address them accordingly by filling in gaps or leveling uneven surfaces.
To prevent water leakage and maintain a watertight seal around the edges of our shower tray, we’ll apply a layer of waterproofing membrane on top of our prepared subfloor. This will help protect against potential water damage in surrounding areas.
With everything measured accurately and preparations complete, our shower area is now ready for installing the new shower tray!

Choosing the Right Shower Tray
To make the right choice, we need to consider factors like size, material, and style when selecting our shower tray. The shower tray is an essential component of any bathroom, and it’s important to choose one that not only fits our needs but also complements the overall design of the space.
When choosing a shower tray, here are some key considerations to keep in mind:
- Size:
- Measure your available space accurately to ensure the tray fits perfectly.
- Consider the desired showering area and whether you prefer a larger or smaller footprint.
- Think about accessibility requirements if applicable.
- Material:
- Acrylic trays are lightweight, durable, and easy to clean.
- Stone resin trays offer a luxurious feel with excellent durability.
- Steel or cast iron trays provide strength and stability but may require additional support.
- Style:
- Choose a tray that matches your bathroom decor and personal taste.
- Consider whether you want a low-profile design for a sleek look or a raised edge for added water containment.
Installing the Drain and Plumbing Connections
Before beginning the installation process, it’s crucial to ensure that the drain and plumbing connections are properly aligned and functional. We want to make sure that everything is in good working order before we start installing the shower tray. First, we need to check if the drain is aligned with the center of the shower tray. This will prevent any water pooling or draining issues later on. We also need to inspect the plumbing connections for any leaks or damage. It’s important to fix any problems now rather than having to deal with them after the installation is complete.
To align the drain correctly, we can use a spirit level and adjust it as needed. This will ensure that water flows smoothly down into the drain without any obstructions or blockages. Additionally, we should check all plumbing connections for tightness and make sure there are no signs of leakage.
If everything looks good, we can proceed with installing the shower tray. However, if there are any issues with alignment or functionality, it’s best to consult a professional plumber who can help resolve these problems before proceeding further. Taking these precautions will ensure a smooth and hassle-free installation process for your new shower tray.
Positioning and Securing the Shower Tray
Now, let’s make sure we properly position and secure the shower tray in place. This step is crucial to ensure a sturdy and leak-free installation. Here are some key points to keep in mind:
- Measure twice: Before positioning the shower tray, double-check your measurements to ensure it fits perfectly in the designated space. A snug fit will prevent any movement or gaps that could lead to water leakage.
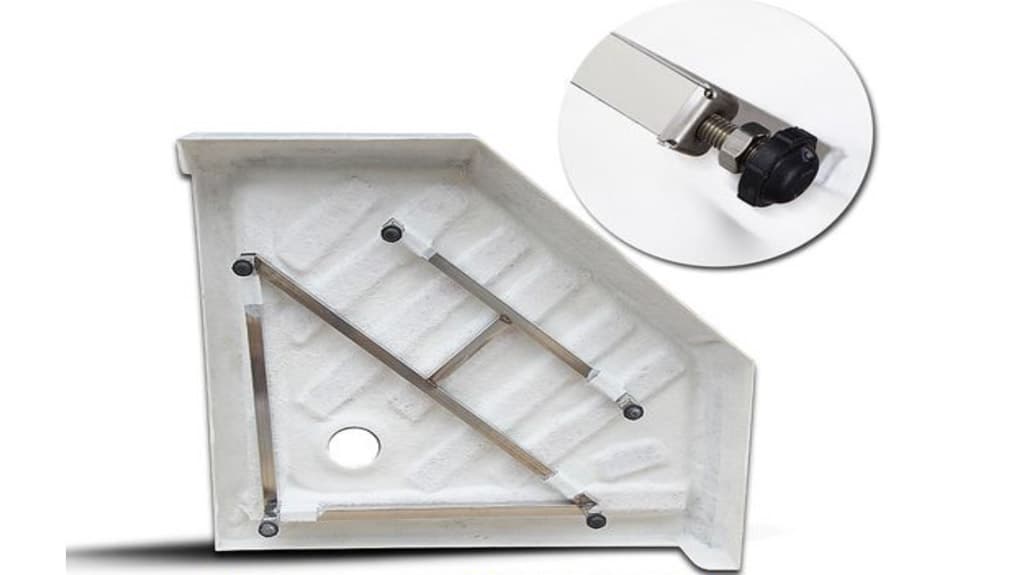
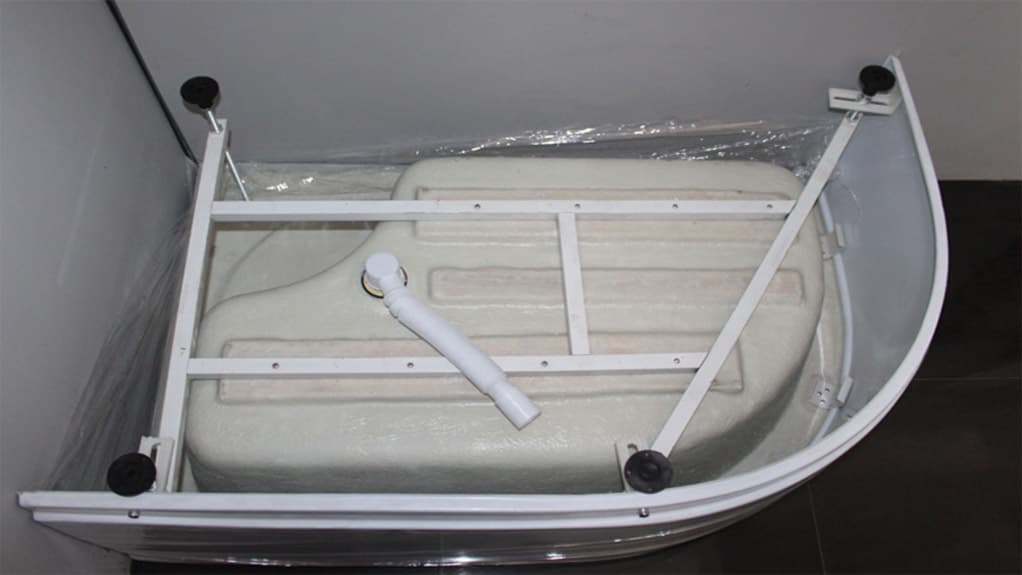
- Level it out: Use a spirit level to check if the shower tray is sitting evenly on the floor. Adjust the position as needed by adding shims or adjusting feet. A level tray will help with proper drainage and prevent water pooling.
- Secure firmly: Once you’re satisfied with the positioning, secure the shower tray using screws or an adhesive recommended by the manufacturer. Make sure to follow their instructions for proper fixing methods.
- Test for stability: Give the shower tray a gentle shake after securing it to ensure it doesn’t wobble or move excessively. If you notice any instability, recheck your installation and make necessary adjustments before proceeding further.

Waterproofing and Finishing the Installation
Once you’ve waterproofed and finished the installation, your bathroom renovation will be complete. Waterproofing is a crucial step in ensuring that your shower tray remains durable and free from leaks. To begin, apply a layer of waterproof membrane over the entire surface of the tray, making sure to cover any joints or corners thoroughly. This will create a barrier against water penetration and protect the underlying structure from damage.
Next, it’s time to finish up the installation by sealing any gaps and applying a final coat of sealant. Check for any areas where water could potentially seep through, such as around the edges of the tray or where it meets the walls. Use silicone caulk to fill these gaps, smoothing it out with a putty knife for a neat finish.
Finally, apply a bead of silicone sealant along all visible edges of the shower tray. This not only provides an extra layer of protection but also gives your installation a clean and polished look. Smooth out the sealant using your finger or a caulk finishing tool for professional results.
With proper waterproofing and finishing touches in place, your newly installed shower tray will be ready for use. Enjoy your renovated bathroom knowing that every effort has been made to ensure its longevity and functionality.
Frequently Asked Questions
1. How Do I Choose the Right Type of Shower Curtain for My Shower Tray?
When choosing the right type of shower curtain for our shower tray, we consider factors such as size, material, and design. It should be waterproof and complement the overall aesthetic of our bathroom.
2. What Type of Flooring Is Best Suited for a Shower Tray Installation?
When it comes to choosing flooring for a shower tray installation, we recommend using materials that are waterproof and slip-resistant, such as tiles or vinyl. These options provide durability and safety in wet environments.
3. Can I Install a Shower Tray Without Professional Help?
Yes, we can install a shower tray without professional help. We just need the right tools and materials, and follow step-by-step instructions or watch tutorials for guidance. It’s a DIY project!
4. Are There Any Specific Building Codes or Regulations I Need to Follow When Installing a Shower Tray?
Yes, there are specific building codes and regulations that we need to follow when installing a shower tray. It is important to ensure compliance with these standards for safety and functionality.
5. How Do I Clean and Maintain the Shower Tray to Ensure Its Longevity?
To keep our shower tray in top shape, we clean it regularly using a mild cleaner and soft cloth. We also make sure to avoid abrasive materials that could damage the surface.
Conclusion
In conclusion, installing a Unity Metal shower tray is like building the foundation of a house. It requires careful measurement, choosing the right materials, and precise positioning to ensure a solid and leak-free installation. By following the steps outlined in this article, you can confidently tackle this task and create your own oasis of relaxation in your bathroom. So go ahead, grab your tools and get ready for a rewarding journey of transforming your shower space into a haven of bliss!


